Monday, August 16, 2010

Inspiration for swaps

So I have been looking around for inspiration for swaps. I'm not color challenged, I do love to play with color. Sometimes I'll use home decor as a way to find colors to put together when I am trying to come up with a project. For several months now I've been thinking of testing out a color combination that was inspired by a friend of ours. Their bathroom has this really distinct look to it. I love the walls in their deep mustard color and the towels in the brown and red that they use. I stored that combination in my head till recently.

I had to do a swap using a stamp set from our new catalog. Normally I would use stamps from multiple sets because there are so many that work well together, but this time around I chose to use a set that I absolutely love . It's called Notably Ornate (120561 Please note this is the product code for clear mount)

Here is what I came up with. Hope you enjoy.


As you can see I used a red, Cherry Cobbler to be exact. I have my brown in there as well, I went with Early Espresso for it's deep brown tones and of course I used More Mustard. I used the crumpled and color technique that I love to add more color to the paper. It also gives it a slightly more aged and worn look.

The note section of was stamped in Early Espresso onto Naturals Ivory paper. I just can't get enough of this paper. It looks like it was made from recycled fibers so you can see the natural spots throughout the paper. I then stenciled using the Elegant Trio stencil (118262) I love this stencil. This was the first time I've been able to use it, I sort of misplaced it for awhile. I sponged the entire stencil in More Mustard and then went around the edges and used Cherry Cobbler. This color is simply a must have. I am not a huge fan of reds, but this one is a very nice red to use. I tore the edges around the note stamp, distressed it some using the distressing tool, it comes with our Cutter Kit (106958) If you don't have one you could get by with using your nail to rough up the edges, though it won't give you the same look. Afterwards I took and rubbed the edges directly into the Early Espresso Ink pad to make the edges look almost as if they had been singed and this was all that was left of a larger document. I used the oval stamp from the set and stamped that into Early Espresso onto the Naturals Ivory then cut around the edge. I then punched out in Early Espresso the Extra Large Oval punch. I mounted the stamped part using Stampin' dimensionals to give it some pop and then took snail adhesive around the bottom of the Early Espresso oval so I could attach the Chantilly Crochet Trim (118480) Then I stamped in Cherry Cobbler with the Just Because stamp and stamped that onto Naturals Ivory. I punched it out using the Modern Label punch (119849) Then I sponged the edges with more mustard. That was placed over the center to cover up the lines on the oval stamp and I popped those up as well. To finish it off I used the flower punch from the Itty Bitty Shapes punch pack (118309) and pushed a vintage trinkets brad (118764) through the center. I pinched the edges of the brads back to the center and popped up using a mini glue dot (103683)

You would think I was stuck in a time warp right? Wait till I show you my next swap. I wanted to a Get Well card and thought of doing a slightly more masculine card. I'll post that one soon.

Hope you enjoy your day or evening, wherever you may be. Till next time. Happy Stamping.

Wednesday, August 4, 2010

Monogram Matchbox

Oops I think i may have skipped a day. You'll have to forgive me. The past day and half has been rather hectic and today was no exception. I was up till 2 working on a few things and spending some quiet time watching some tv with my hubby. Our 2 oldest daughters started back at school today. Our oldest is in the 8th grade and our middle daughter is in the first grade. Our baby starts school tomorrow and she'll be in Kindergarten. I am looking forward to a quiet house and the freedoms and responsibilities that come with that alone time. For one thing I can focus on my business more and I can get out and meet more people, especially people of the adult variety. Of course the house should be a lot easier to maintain since I won't have kids in the house all hours of the day.

For today's project I used the Matchbox die. I think it is a really nice die to own. I've created cute little party favors using them, not to mention that when it first came out it was during our 2009 spring mini catalog period and it was so close to Easter. I came up with a little bunny and chick that stood up. I suppose I could have filled them with candy but they were just really cute when they stood up.


I used Crumb Cake card stock for the drawer part of the matchbox. The lid part was cut out from the new Love Letter Designer Series Paper (DSP) 117162. I used the Victoria Crochet Trim(18481) to tie a bow around the lid. then I decided it needed something. So of course I reached into my new Neutrals designer buttons (119743) and grabbed an Early Espresso one. I tied it up using linen thread (104199) and then I used the 1 1/4" circle punch (119861) to cut out a piece of Early Espresso card stock. Then I stamped in Riding Hood Red Classic ink onto Naturals Ivory card stock using the Monogram Sweet (115462) Of course I had to use an S for my initial because at the time I had no idea what other letter to use. I punched that out using the 1" circle punch (119868) Then I punched a hole through both using the crop-a-dile (108362) then finished it off using the linen thread that had been pulled through the button. So simple.

Of course the matchbox couldn't be left empty now could it? Of course not!

.

I used some leftover scrap from the Love Letter DSP and wrapped it around 2 pieces of Ghiradelli chocolate squares, you can also use Hershey's squares since they're the same size. I tied it up in a little bow and stuck it in the box. I didn't realize till now that the candies are upside down so you can't see the little bow, but you get the idea.

Getting back to the outside of the box itself. I was tired of doing all of my projects with only the neutral colored crochet trim so I pulled out my new Early Espresso Stampin' Write marker (119680) I rubbed the marker along the crochet trim to give it some color. You can still see some of the neutral underneath but I think it added to the project some.

Thanks for stopping by today. Tomorrow I hope to finish off this series with a card that I came up with as well. Till then Happy Stamping!

Monday, August 2, 2010

Vintage Two tags gift tag holder

Continuing on with my vintage/antique demonstration projects here is another one. The idea came from a design by Jacque Craig of Craft Project Central. I did a project similar to this one last year that was designed by my up line Kimberly Van Diepen. Papers and colors used have been changed up as much of the product used in the original piece has been retired.

So here is my creation. Hope you like it.


The base of the project is done in Early Espresso, my new favorite neutral color, besides Chocolate Chip and Soft Suede. I used some of the Love Letter DSP (117162) I fell in love with this sheet of paper before I could even order it. The paper itself was pretty bland but I love the fact that I can stamp on it to add color and dimension to it. I used the flowers from the Razzle Dazzle set (116714). I inked it first in Riding Hood Red and used the rock and roll technique to ink it up in Basic Black ink. I stamped it 4 times in each of the 4 corners and after I was done with that I took the Crumb Cake ink pad and dragged it across the paper to achieve the desired aged look that I was looking for. After I mounted it onto Basic Black card stock and then added the flip side of the DSP in the hounds tooth pattern and applied it about an inch from the bottom. The top was tied off with Victoria Crochet Trim (118481) and added one of our Vintage Trinkets safety pins (118764) into the knot.

Here is the scallop part of the box front up close:


I punched out the scallop circle in basic black and attached a 1 3/4" circle punched out of Riding Hood Red on top. Then I colored in the circle stamp from Matchbox Messages (113800) using Riding Hood Red and Crumb Cake Stampin' Write markers and stamped it onto Naturals Ivory card stock then I punched it out using the 1 1/4" circle punch. When I had that part assembled I flipped the scallop circle over and use snail on the back to create the ruffled edge around it using the Victoria (118481) Crochet Trim. I love our new Crochet trim. They are absolutely fantastic.

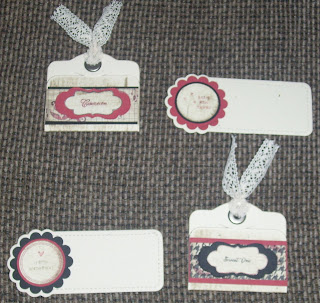
These are the tags that go into the bag:

The originals are kind of plain since I didn't use the aging technique on the scalloped tags before I put them together. I demonstrated these at our meeting on Saturday though and decided that I would age those. They turned out much better. I find there is a bigger difference in taking a sponge to ink up a project then to use an actual ink pad on the project instead. If you haven't already tried it I recommend it the next time you stamp.

The tags are all cut from the Two Tags Bigz die (115954) I love this die it is super versatile and there is a lot you can do with it. I also used the Lots of Tags sizzlits die (114508) after stamping out the greetings from Matchbox Messages (113800). I also used our pewter jumbo eyelets (108432) and more of the Victoria Crochet Trim.

Hope you enjoyed. Till next time, happy stamping.

Jewelry from Stampin' Up! brads?

Yes you read right. The title is not a mistake. I have some really talented friends who are not only great with stamps but great with making Jewelry using Stampin' Up! products. When our new catalog came out and I saw our new Antique brads (117273) I just had to make some jewelry with it. I am not a jewelry maker but I figure it couldn't be too hard especially since I knew what I wanted to use. I used the three larger brads from the set of five styles. We don't sell links to make chains out of or clasps so I did use some non Stampin' Up! product on this but I still think it came out pretty good. I think this would look pretty good if it were longer and made into a chain belt. :)


Here is a close up of the brad designs. They are really nice I love them and they look great on paper too but it was nice to try them for something else too.


Thanks for stopping by again. Till tomorrow. Happy Stamping friends.

Sunday, August 1, 2010

Notably Ornate Antique Box

Did I mention how much I enjoy making boxes out of paper? I'm sure I have and this is no different. Remember my Monkey's box that I made for my friend? Well during the process of putting the measurements together, which were done in my head and not on paper, I realized after I put it together that I hadn't measured right. Needless to say after all the work of putting it together I now I had a box that was too small for what I needed it for. I put it off to the side and figured eventually I would need it for something or other. Well the something or other came up on Thursday. I decided to work with the blank canvas I had in front of me and this is what I came up with.


I think maybe I went a little crazy but it looks pretty old to me don't you think so too? I used the new Notably Ornate stamp set for this box. So the base of the box was made using Crumb Cake, for those of you who have been with Stampin' Up! for a long time, this is the new name for Kraft. I used Early Espresso and ran it through the Big Shot using the Perfect Details Texturz Plate (115962) Next I used our new Crochet Trim, this one is called Victoria (118481) to tie a bow in the upper right hand corner. The bow was just too plain so I found one of our new Early Espresso Designer Buttons from our new Neutrals collection (119743) and tied it up with some linen thread (104199). Of course I couldn't seem to stop there it seemed like it was still missing something. So then I decided I wanted to use some of our new Vintage Trinkets (118764) I used one of each of the colors of safety pins. Here is a closer view of what the finished section looks like:


Next I took some of our new Marina mist paper and gently started to crumple it up to break down the fibers so I could roll it up into a ball without actually tearing the paper. When I was satisfied with it I took the wadded up ball and rubbed it around first in Marina Mist classic ink and then rolled it around in some Night of Navy. What you can't see from the photo is how those colors were picked up by the paper. Only a little of it actually shows up in the final product. When I was done I unrolled the paper and flattened it up some by rolling it through the Big Shot. If you make the standard Big Shot sandwich, but without the paper inside you can put the paper on top and roll it through. It helps to flatten out whatever you're working on. In this case because the fibers were stretched out the paper had little ripples in the edges so it was perfect when I went back in to crumple it up along the edges of the paper. Then it came down to the corners and they were starting to open up so I decided to curl the top layer up into itself and curl the bottom layer down repeating the same process. Next I stamped the note paper stamp in Marina Mist, did a sort of rock and roll into Night of Navy and then very lightly rubbed Early Espresso around the edges and then stamped that onto Naturals Ivory paper. I love the Naturals line of paper because you can see all the tiny flecks of color in them. Next I took the Crumb Cake ink pad and rubbed it across the paper till I achieved the desired aged affect. I slowly tore along the edges to make it look worn and then rubbed them directly across the Early Espresso ink pad. It made it look almost as if the paper had been burned and this was all that was left.

Now for the bottom section I used the same rock and roll technique on the Take Note oval stamp from the set but omitted the step of adding Early Espresso to it. Next I rubbed Crumb Cake across the top to age it. Then I cut around the edge as close to the stamped image as possible and then used the Extra Large Oval punch to punch out a piece of Early Espresso then I matted the two together. It still didn't look finished though so then I took some of the Chantilly (118480) crochet trim and started to stick it to the back of of the oval creating a ruffled skirt around it. Now it looked done. This is a close up:


Lastly I wanted to add the bird from this fabulous stamp set to the project. The bird was rock and rolled in the same two colors and edged again in Early Espresso. I cut out the bird and then added one of the smaller of the new Basic Rhinestones (119246) for an eye. I popped it up and mounted it on the bottom left of the box like so:


Thanks for stopping by. I hope you enjoyed looking at this project, as much as i enjoyed creating it. I hope tonight I'll have the opportunity to post some more. Till then have a great day and Happy Stamping.