Saturday, June 26, 2010

Monkey's on a box

So I told you I was busy with baby showers didn't I? I have another great friend that I've known since grade school and she and I found each other about a year ago and reconnected through Facebook. We found out we both moved from our small town in Hawaii to Colorado and we live about 76 miles away from each other. I offered to help her create unique baby shower announcements for her shower. I came up with a few samples for her to choose from and the final one was this made with the little monkey from Fox and Friends. I am so happy this set is not retiring and has made it into our new catalog. I thought I would make a box to put the cards in afterwards, just wanted to test out my box making skills a little more so here'swhat I came up with:


Just to customize them to the baby's room I asked her what the nursery looked like. She said it was more sophisticated with blues and browns. I love to use Bashful blue and since blue's and browns go well together I decided to use Soft Suede as well and very vanilla on the cards. I used the diamond patterned textures plate on the background and spritzed each sheet with shimmer mist before running it through the Big Shot. I finished it off with a few brads and stamped the greeting in Very Vanilla Craft ink.

Here is a close up of the box lid, I love these little monkeys.

I used the tree and leaves from another favorite stamp set, Season of Friendship. I stamped the trees down on the box first and then stamped them out again on Very Vanilla, cut them out and then popped them up over the other trees. The Old Olives Leaves were stamped directly over the trees on the box and then the leaves in Certainly Celery were individually stamped and cut out to be popped up onto the tree. After I was done placing the leaves where I wanted them I stamped the monkeys out in Soft Suede and cut each of them out as well. The banner was spritzed in shimmer mist after "rock-a-bye baby" was stamped on it using Soft Suede. This greeting comes from the retiring set Nursery Necessities. If you like this set you still have a few days to order it before it goes away forever.

Hope you are having a fabulous weekend and I will post some new ideas soon. Been working on some things for the Falcon Days/Falcon Festival being held 4th of July weekend on Saturday out here in Falcon just off Stapleton Road. Come stop by and say hello if you happen to be in this part of town. Come say hello to me and my friends.

Happy Stamping

Friday, June 18, 2010

Scrapbooking on canvas


So this is a fun technique I learned how to do . Instead of scrapbooking on a page that goes directly in to a book why not scrapbook directly onto a canvas instead. This is so much fun. It's super easy and the longest part of the whole thing is actually allowing for the paint to dry, pun intended.

I learned to make these from a fellow demonstrator and good friend Christy, who learned it from our fabulous upline Kimberly. I really have learned from the best and I am so grateful that I have been blessed to know both of them. We're bidding a fond farewell to Kimberly as she moves across the country. It is however not a forever goodbye but more an until we meet again goodbye.

I took this photo of my girls last year when we hiked up to the top of Seven Falls. It was a rainy day and the girls were drenched but I wanted to remember the beautiful hike we had up to the top and thought it would be perfect for this canvas. The paper is a retired paper in Red Riding Hood Red. The ribbon is our 1" double stitched chocolate chip grosgrain which is retiring on July 1. I haven't checked our last chance lists so it may already be gone. I tend to say goodbye to the last chance list iems when they are announced and will use only what I have left and won't buy anymore of that particular item, especially because I have never been disappointed when the new catalog comes out. The letter and circle were cut from long board chipboard pieces that we sell. Both were inked in craft inks and embossed with clear embossing powder. I used both Very Vanilla and Chocolate Chip inks. I tied it off with linen thread through the bow so that it gives it a little motion and will dangle from the canvas. The stencil in the background comes from our Definitely Decorative home decor line and is Kind Thoughts Brocade (S) Item number 116572. Stencils add great definition to not only your walls but they look fabulous on cards and canvases alike.

I have another canvas class listed on my Stampin' Up! website for the month of July http://samanthamalchow.stampinup.net Check it out if you're interested.

Wednesday, June 2, 2010

Stamper's appreciation night

As promised here are the projects from my Appreciation stamp night. Mostly for my downline but also for a few other great stamping friends to come by and stamp with me. As well. The box design was inspired by a card I received from my upline Kimberly. I am sad she will be leaving us soon and moving on to DC. She has inspired me to do so much over these past 3 years and I love her for it.


So what you are looking at first is the cover/lid to the gift box. I used some of my favorite current products as well as colors since I will be saying good bye to Bermuda Bay shortly I thought I would use it on this project, as well as using Soft Suede and Crumb Cake (Kraft)

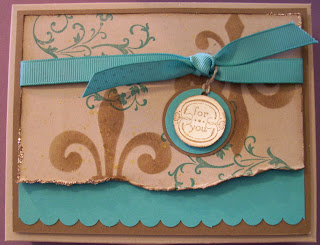
I used stamps from the new Summer Mini catalog. Elements of Style. It's a really pretty set. I also used the Fleur de Lis stencil from the Elegant Trio stencil found in our Definitively Decorative 2010 catalog. I love how stencils have been able to enhance my stamping experience even more. There are a few things I will point out, since I photographed this under less than perfect lighting conditions. For one thing the Fluer de Lis were first stenciled and then before removing the stencil I shot it coated it with shimmer mist. I used a paper towel to wipe off the excess from the stencil before lifting it off the project. Then I repeated it on the other s
ide. This gave it a less shimmer effect and allowed me to only shimmer the parts I wanted to. The second thing is that this first sample was spritzed with some gold glow smooch spritz and you can't see it very well. For the final project we decided to try Log cabin smoo
ch spritz as well as the gold glow. I think for future I would probably recommend just using the spritzing tool with soft suede instead. It's a little less messy. The last thing we decided to change on the finished box was that we used the new square lattice textured impressions folder on the Bermuda Bay scalloped strip at the bottom of the box. It matched what I had done to the card that came later in the design process.

The following three samples are of the cards we did to complete this boxed collection. I designed much of the color theme and c
ards around the box itself so that they'
d form a more cohesive unit.


So this first card is actually the hardest of the group because it uses a lot of tools and
embellishments.

I did the same technique again on this card w
here I used the Fluer de Lis stencil first in soft suede and spritzed over it with shimmer mist before blotting and lifting up the stencil.

I also used stamps from Elements of Style and a little stamp from the Charming stamp set. I used the sp
ritzing tool on this in soft suede. If you notice along the bottom of this one the Bermuda Bay scalloped st
rip was run through the square lattice textured impressions folder for just a little extra oomph that was needed.


This next card was inspired by another great demonstrator Jenny. I recently receive
d a card from her that inspired me to use a technique I haven't used in quite a few months. The Elements of Style stamp set is a great set to really show it off with too.

I stamped the flowers from Elements of Style in Versamark and then used Taken with Teal on the flowers and Certainly Celery for the leaves and stems. Next I sponged with Soft Suede. I didn't want to sponge only the edges I thought it would look better if I sponged all the way to the edge of the flowers to give it that really worn vintage look. For the hummingbird I used Bermuda Bay and used the Rock and Roll technique on the outer edges in Soft Suede. After cutting it out I went back in with a sponge and Soft Suede and added a little more to the edges to really make it look worn. The flowers
in the background behind the greeting were stamped in Bermuda Bay. I love how so many of our colors are so close that they all would work so well together.


This last card was another borrowed idea. Hey no one ever said I had to come up with ideas on my own.

I mad a card similar to this, with a lot less stamping involved, at Passport to Success. It was Kimberly's last big event she put on for us demonstrators.

So for this card I used a stencil from the new Mostly Vintage stencil set. Notice a trend here? Vintage is Tres Chic. I also used Elements of Style and dusted off my Heard from the Heart stamp set. I haven't used it in quite some time. I finished it off with some of our black satin ribbon. Yummy. If you notice it's a "no layer card".

Well thanks for stopping by. I hope you enjoy your evening and "Happy Stamping."

My new catalog and stamping goodies arrive tomorrow and I hope to have some new samples for you in my next blog post.