Friday, October 28, 2011

Revisiting and redoing one of my favorite cards

So if you've been following me over the last 22 months you'll probably remember this seeing this card design before from my Stamper's Appreciation Night post last year. I wanted to redo it because I liked it so much and it showcases a lot of different techniques and utilizes many of my favorite products all in one place.


So this is the new card that I did:


.


There are a few things I changed up on this new card. For one thing the card itself is made using more neutral tones. The card base is Naturals Ivory(102316) card stock. If you like paper that you can see natural flecks of material in it, then this paper is for you. I took another piece of the naturals ivory and used that for the main part of the card. I tore off a section off the bottom. Then I sponged on the fluer de lis, from the elegant trio (118262) decor stencil, crumb cake classic ink. I then stamped the smaller vines stamp from Elements of Style (120045) in river rock. The last stamp used comes from the stamp set Charming (125829), and was stamped in early espresso. I randomly stamped these onto the piece of card stock. After that was completed I ran the entire piece through the big shot using the vintage wallpaper embossing folder (120175). Then used the distressing too,l from the cutting kit (106958), and distressed all of the edges including the ripped edge. After that the entire piece was sponged in early espresso and the torn edge I rolled towards the inside of the card to give it a more finished look. Two of the corners have champagne glass glitter (120997) added to them using crystal effects. Once the glitter dried I tied a knot on the card using the 3/8" quilted satin ribbon in early espresso(124104). You can currently find this item in our holiday mini catalog. It's really nice. If you like it I recommend getting it now while we still offer it as I can't guarantee it will available again after December 31st.

I then took a piece of river rock card stock and punched it using the scallop edge border punch (119882). That was tacked down using snail and the main piece was applied over it using dimensionals.

Next I punched a 1 3/8" circle using in early espresso and stamped a greeting on naturals ivory using the same stamp from charming but this time stamped it in river rock. Then I stamped the thank you greeting from the teeny tiny wishes set (115370). If you don't already own this set, you really should. It is probably the best and most versatile greeting set that we offer and it's perfect for every occasion. I punched the greeting out using the 1" circle punch (119868) and sponged the edges in early espresso. Then it was mounted onto the early espresso punched piece using dimensionals(104430). I punched a hole using the crop-a-dile (108362) and tied a piece of linen thread (104199) through it and tied it onto the early espresso ribbon. I added additional dimensionals on the back of this circle to secure it to the card.

To finish the card off I spritzed it using shimmer mist made using a combination of frost white (116854) and champagne (116806) shimmer paints with rubbing alcohol.

Hope you enjoyed seeing my redo of one of my favorite cards. These cards went out to recent guests and customers from a workshop held in September. I hope they enjoyed these cards as much as I enjoyed making them.

Come back again soon for more great stamping ideas.

Till next time, Happy Stamping!


Thursday, October 27, 2011

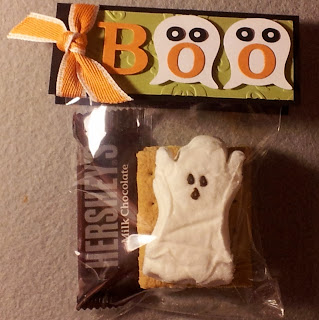
Spooky S'mores treats

So did you miss my spooky halloween treats class? Well here's a look at 2 of the projects that you missed. You could have picked from one of these two cute halloween s'mores treats. These will used as teacher gifts for my daughters teachers and some of the other staff who work there. You could give these away to just about anyone and I know they'd enjoy them.


So I saw this really cute idea online and had to make these little guys. So this first one I made using the medium cell bags (102757) This includes 2 pieces of graham crackers a small Hershey's Milk chocolate bar and 2 pieces of pumpkin peeps. The tag was created using basic black card stock, I dry embossed a piece of pear pizzazz card stock using the spider web (120889) embossing folder. Then I stamped Happy Halloween in basic black on peach parfait card stock and punched it out using the decorative label punch (120907). I cut a piece out big enough at the top of the tag to slide a piece of peach parfait 1/2" stitched poly ribbon (119264) 

For treat number #2 we used the ghost peeps instead of the pumpkin peeps. The pear pizzazz card stock was embossed using the vintage wallpaper (120175) embossing folder this time. Then I cut the B and o's in Boo out using the Medium Sizzlits Timeless Type Junior Alphabet (115951). The ghosts are made using the owl builder punch (118074) I punched them out using whisper white card stock. To create the ghost you cut off the legs of the owl and turn it upside down. The eyes are also made from the owl builder punch using the smaller 2 circles and are punched out in whisper white and basic black. I popped them up using Stampin' dimensionals (104330)

These look so much better in person. If you want to pick up any of these cute items please visit my online store. Click here to order.

Come back again soon. I'm working on Halloween treats for my daughters to pass out in school this year. This year I'm being more candy conscious though so the kids aren't going to get candy, but rather a good treat to use at school.

Till then, happy stamping to you.

Wednesday, October 26, 2011

How's about a little impromptu wedding card?

Now this card may look familiar to those of you who are my friends on Facebook. If you're not it's not a big deal because I'm sharing it here now.

As you may remember I was working a local craft show over the weekend. Friday night after I got one from the first day of selling I checked our home phone and heard a message from my husbands friend. The message wasn't for him it was for me. He was looking to see if I'd be willing to make a card for his friends wedding the following morning. Knowing I had left almost all of my supplies at the craft show to work on projects during the day on Saturday I let him know I could get it done but not till the following morning and I wasn't going to be at the craft show till sometime after 8 am when they let us in to the facilities to get ready for the days events. Panic did set in for a few minutes. I went to bed Friday night almost certain I could get the card done before 9 am when we opened for business. The following project was created in under 15 minutes. Not too bad for a card on the fly, if you know what I mean.


I do apologize for the poor quality of the photo. The lighting in the gym was inadequate to say the least. 

So for this card I dug out my shimmery white paper (101910). I don't use it often but I think it adds a hint of elegance to any wedding card. I could have shimmer misted any color of card stock but I wanted to have a clean look to it. I decided to go with the silver and white combination for this card. After I picked out the paper I cut it to the size I wanted and dry embossed it using the elegant lines (119277) embossing folder in the big shot (113439). I then added our self adhering basic pearls (119247) into the embossed design where I thought it would add that little extra something to it.  I then stamped in versamark (102283) using the "Congratulations" greeting from the stamp set Wedding Sweet (115466) Then I embossed it using our silver embossing powder (109131) and our heat tool (100005). After this I used some retired silver organdy ribbon (I don't know why we stopped selling this stuff it's gorgeous) and tied a knot on the card. Then I matted this onto a piece of our silver waffle paper (120984), which is sold in a 2 pack with gold waffle paper. To finish it off I used dimensionals (104430) on the waffle paper and stuck it to the card and viola! My quick impromptu card. I was done in way less time than I thought it would take and was pleased with the finished product.

Come back soon. I'll be sharing a couple of my spooky treats from my halloween treats class earlier this month. If you missed out, don't make that mistake and miss out on the Holiday treats class for Christmas coming up soon. Keep an eye out for it in my class schedule. I can guarantee they'll be as cute, if not cuter than my spooky treats are.

Till then, happy stamping!

Thursday, October 20, 2011

It's Craft Show time


So it's the big time of the year for me where I like to participate in a few craft shows in my local community. Mostly it's to get out of the house and meet new people, sell off some of my retired stamp sets as well as a few hand made items. My next big event is this Friday and Saturday at the Falcon Craft Show to benefit Helping Hands.
I've been busy working like mad to get projects done. My favorite part about all of this is that it really helps me to get rid of my retired DSP's from the year before. I'm a hoarder and I will admit that sometimes I get a little carried away with all the beautiful coordinating papers that we have to offer in addition to all of our lovely card stocks.
This year I decided to also try to use up some of my retired ribbons. So I'm offering several really cute projects most of them are using up retired products but I don't think that will really matter all that much. With the help of my good friend Monica, we are cranking out some great items that we'll have up for sale this weekend. I'll be sure to take pictures of all the little lovelies that we'll have on display after it's all set up. I won't leave you hanging though. Here are two of my favorite goodies so far.
Though they have been trying to promote this event as a Christmas themed craft fair I always take things for Halloween and for Thanksgiving if possible, as well as for Christmas. Over the years I find that I don't sell my Christmas items as well as I do for those items made for Thanksgiving and Halloween. I think it's because most people still aren't ready for Christmas at the time.

This first one uses the lattice die and I cut 2 and layered them over each other to create the background. I used paper from last year that came out in the Idea Book and Catalog. It had flocked bats on it and was colored in rich razzleberry. When you think of halloween this might not be the first color that comes to mind, but it really works. I stamped the owl on the tree from the House of Haunts (111574) stamp set. Would you believe this stamp set had never been inked till this year? What was I thinking? I love it. I masked off the moon behind the owl using a sticky note punched out with the 3/4" circle punch and sponged over it using rich razzleberry. The last bit of embellishment comes from our new dazzling details (124117) If you love the way glitter, especially dazzling diamonds looks, but don't like having it get all over you then this is the right product for you. Think glitter glue but with dazzling diamonds in it. It is one of my new favorite embellishments to use on any project that needs a little extra something. After everything dried I applied a coat of shimmer mist that had been mixed with both Frost White (116854) and Champagne Mist (11806) shimmer paint and alcohol mix. I was inspired by my great friend and upline Kimberly.

This second one I made using up the last bit of Only Orange card stock that I managed to have lying around. Okay the truth is somehow I managed to mix up my only orange card stock with my pumpkin pie card stock. Only Orange was retired during at the end of the 2009 Stampin' Up! calendar year. I realized my mistake too late and I don't have any pumpkin pie on hand at all. Yikes! The only orange worked in a pinch and I also did some using cajun craze. So first for the pumpkins I cut them out using the scallop circle die (113486) I cut off the bottoms of the front and the back and embossed both sides with the spider web (120889) embossing folder. Each side was sponged in basic black. I used the box #2 die  (114518) for the inside of this lovely pumpkin candy holder. I can't believe how much I use this die. The top part gets cut off so I usually try to cut my paper smaller so there is less waste of good card stock. 

If you notice in the picture my spider is missing a set of legs. I forgot the last two legs in the first place and my 14 year old daughter kindly pointed it out to me. The finished versions have 8 legs. To make the spider I punched out two circles, one with the 1" circle punch and the other with the 3/4" circle punch. I used my favorite googlie eyes. The legs were made by punching out the scallop trim border and using segments of 3 each and 2 for the last set of legs that go right in the front on the finished versions. I used half of the banner found on the cone die and cut them in half after stamping Happy Halloween on them from the teeny tiny wishes set. It's meant to look like a pumpkin purse so that is where there is a satin old olive handle on the sides. After everything was done the front and back panels were spritzed with shimmer mist just to give it an overall finished look with just a little bit of sparkle.

Come back again soon when I share more of the cute little goodies we'll be stocking our booth with. If you're in the Falcon or Colorado Springs area come on over to the Pikes Peak Learning Center out in Falcon and stop by our booth. We'd love for you to come on over and say hello. 

Till next time, Happy Stamping!

Tuesday, October 11, 2011

Check out the new recruit offer to die for


Ever thought about becoming a Stampin' Up! demonstrator? Maybe you just like our products and can't stop buying them. You might not want to sell our products and that's perfectly fine that isn't a big deal but you'd be silly to pass up a great offer like this to earn a free Big Shot, our personal die cutting machine.

Check out the fabulous offer here. It's an offer you just can't pass up. For this month only start your Stampin' Up! journey, whether it's as a hobby demonstrator who joins for the great deal and the discounts they'll receive on their own personal purchases. Maybe you're looking to just make a little bit of extra money on the side while meeting others who love to stamp like you do? Or maybe you're in it for the long haul and would like to turn it into your main job? Stampin' Up! is always looking for new people every day. Don't pass up this opportunity, it probably won't come up again.

For $175 before shipping and tax, you'll receive our standard starter kit which includes a variety of great products to get you started, should you choose to do this as a business, or otherwise. You'll receive $345 in product for this low price. In addition to that after signing up you'll receive a special email requesting your order for the Big Shot ($99 Value). Already have a Big Shot? No problem there, you can substitute $100 in product for it instead, buy more accessories to go with your big shot or buy other additional products that you'll want to use to create with.

I've been busy working and haven't fallen off the face of the earth again. I promise to share something soon. On a side note, my missing camera has shown up again. Let's just say it was living on my stamp desk under a pile of papers that I I had put there and happened to be cleaning it up and found it, months after losing it.

Till next time, happy stamping and creating.